

Installation of the LTI integration between Adobe Connect and Moodle is quite simple, however, it requires some assistance from CoSo Cloud Support and can be done via a scheduled meeting.
This guide will provide you with the items you need to move forward with the installation as well as step by step instructions to install the LTI application within your Moodle instance.
Pre-installation Requirements
In order to install the LTI, you’ll need the following:
- Moodle URL and Two Service Tokens (see below steps on how to obtain)
- An Adobe Connect login that has Administrator access*.
- An account that has System Administrator access to Moodle*.
* For the Adobe Connect login, we suggest creating a “dummy” user in Connect and assigning it to the Administrators group. Using your own, or someone else’s login has the potential to break the connection between the LTI and Adobe Connect. For instance, if your password changes or the Connect Admin leaves the company and their login is disabled, the LTI will throw back a connection error. Having a “dummy” Admin login can help solve this problem.
* Please also note that your Adobe Connect and Moodle username and/or email must match each other and be identical.
Moodle Service Token (1st)
To begin, a temporary Moodle Service Token will be required for the first part of the setup with CoSo Cloud.
The first ‘Moodle Service Token’ is generated in Moodle as follows:
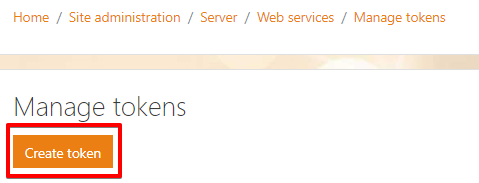
Navigate to Site Administration / Server / Web Services / Manage Tokens (or Site Administration > Plugins > Web Services > Manage Tokens in older versions of Moodle):
Click on the ‘Create Token’ button
You will see the following form:
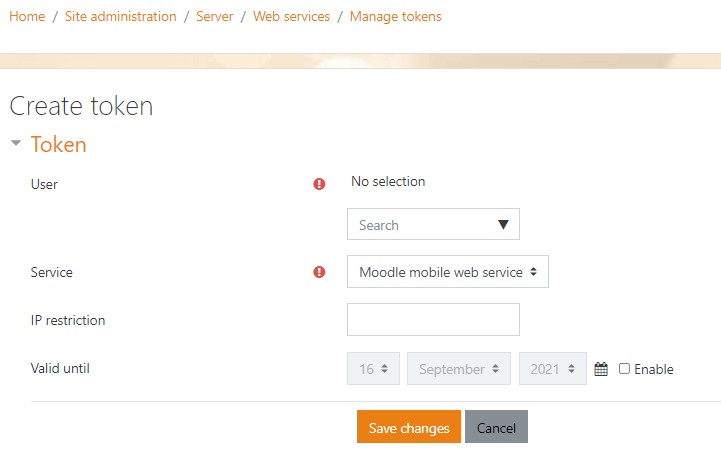
- User: Use the dropdown Search to select a user who is a System Administrator. In some instances, you can also type in the System Administrator email/username and it will appear.
- Service: Moodle mobile web service (default)
- IP restriction: Leave this field blank.
- Valid until: Leave as is; unchecked
Click on Save changes button. You’ll now see your first token in the list:

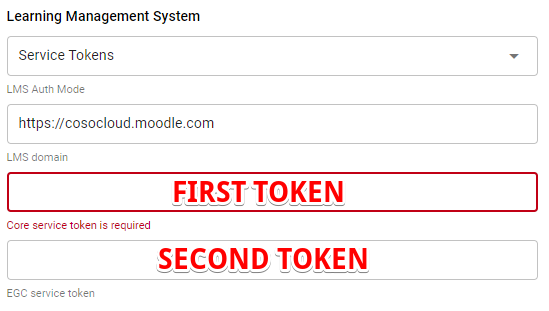
Please note this first token down (which CoSo Cloud will input into their License Manager tool in the ‘Core Service Token’ field (see screenshot below).
The remainder of the back end setup is done via a meeting with CoSo Cloud. Information is added via a screen sharing session (Adobe Connect Admin credentials are entered by you using the Adobe Connect “Request Control” feature. CoSo Cloud does not need to know the credentials.
Once the LTI setup within Moodle is complete, there will be a second Service Token, specific to the LTI, which will need to be provided to CoSo Cloud to complete the installation. We will enter this into our License Manager tool in the ‘EGC Service Token’ field. *
* Screenshot of CoSo Cloud’s License Manager LTI configuration (internal)
LTI Setup
1: In Moodle navigate to Site Administration > Plugins > Activity modules > and click on the Manage Tools link
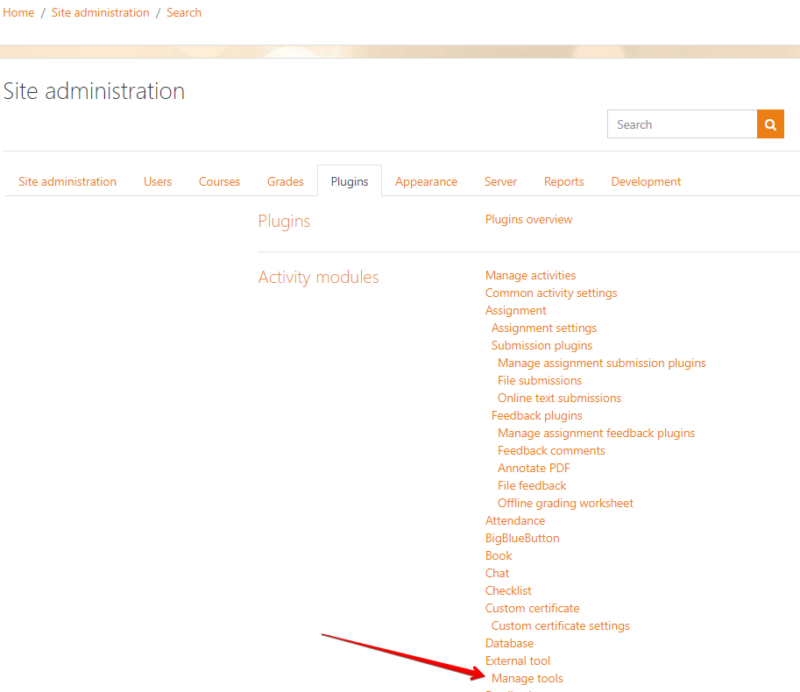
You will see the following page, click on the ‘configure a tool manually’ link:
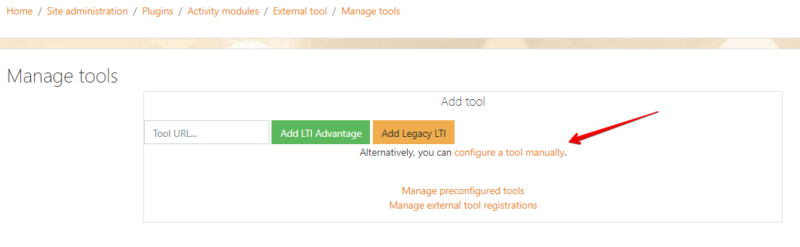
That will bring you to the below form:
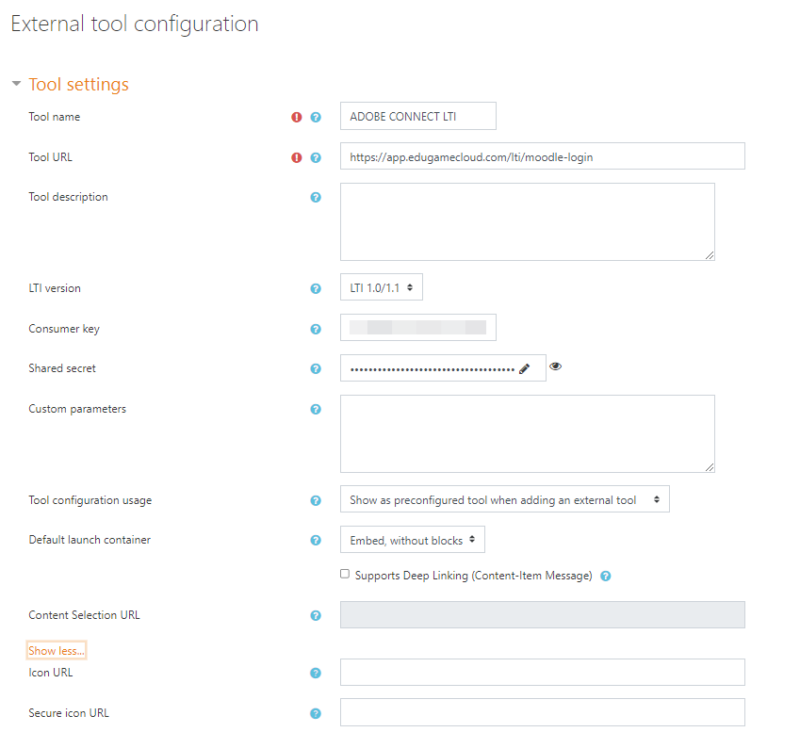
- Tool name: Adobe Connect LTI
- Tool base URL: https://app.edugamecloud.com/lti/moodle-login
- Consumer key: Provided by CoSo Cloud during setup.
- Shared Secret: Provided by CoSo Cloud during setup.
- Custom parameters: Leave blank.
- Use of the tool configuration: Select “Shows as preconfigured tool when adding an external tool”.
Scroll down and expand the Privacy section:

Set all three values to Always.
Click on Save changes button.
2: Navigate to Site Administration > Advanced features
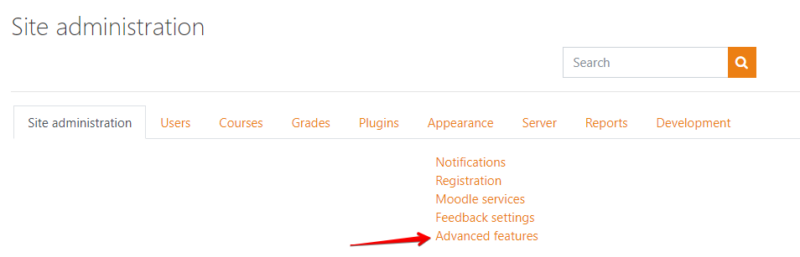
Ensure that Enable web services is checked.

Click on Save changes button.
3: Navigate to Site administration -> Server -> Web services -> Manage protocols.
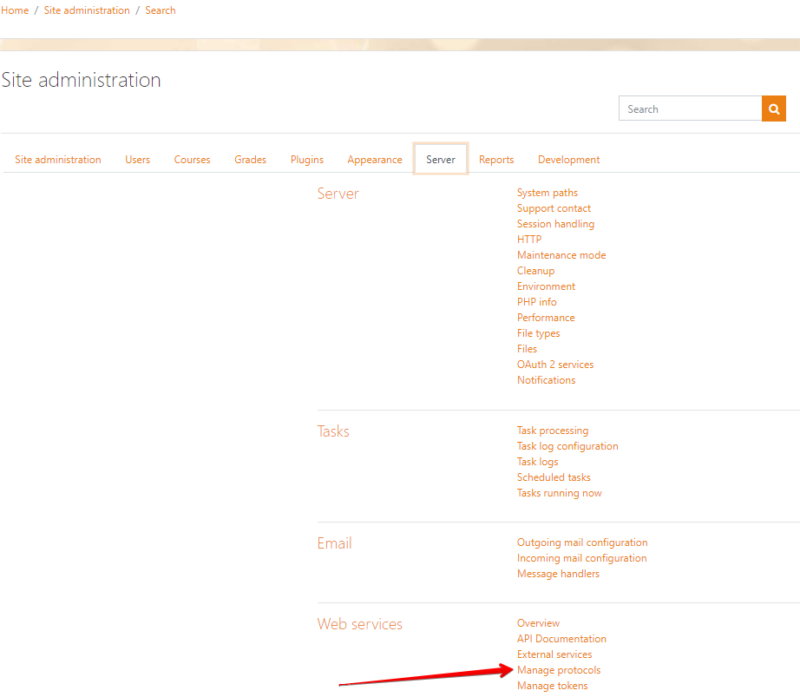
Ensure that the REST protocol option is enabled.
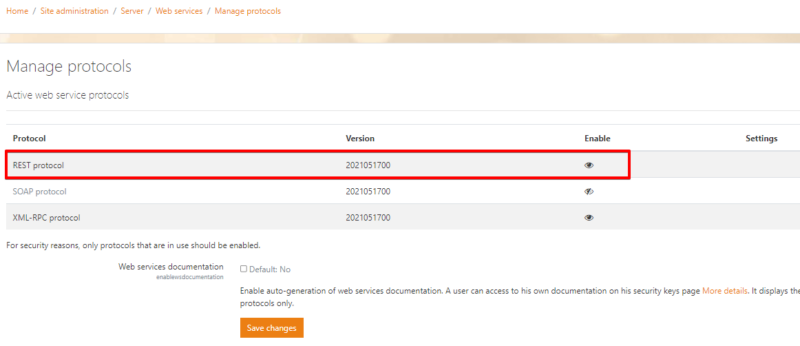
Click on Save changes button.
4: Navigate to Site administration -> Server-> Web services -> External Services (or Site administration -> Plugins -> Web services -> External Services in older instances of Moodle) and click on the Add link in the bottom left
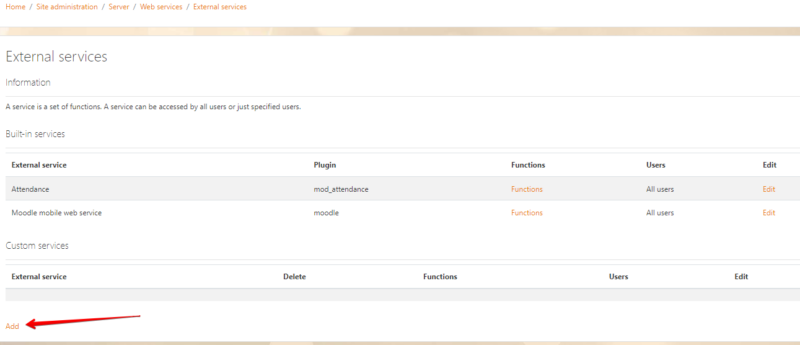
You will see the following form. Fill in as per below:
- Name: Adobe Connect LTI
- Short name: lms
- Ensure Enabled is checked.
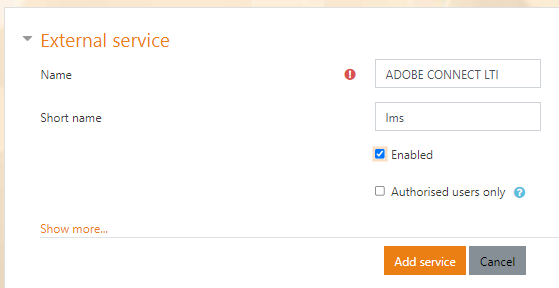
Click on the Add service button to save.
5: You will automatically be taken to a new screen (as per screenshot below). Click on the ‘Add Functions’ link to add a function:
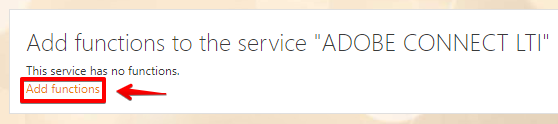
Search for the following function: ‘core_enrol_get_enrolled_users:Get enrolled users by course id‘ and click on it
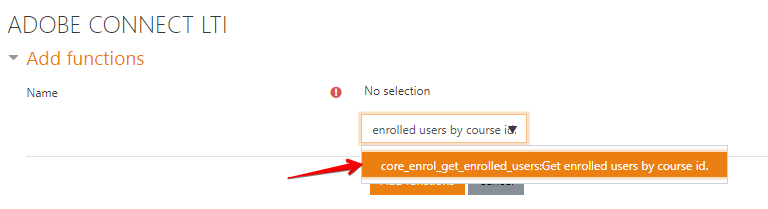
Once added, it will appear in blue in the functions list:
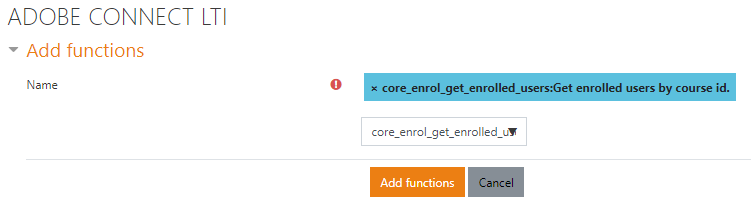
Click on the Add functions button to save.
6: Navigate to: Site administration -> Server -> Web services -> Manage tokens (or Site administration -> Plugins -> Web services -> Manage tokens in older instances of Moodle) and click on the ‘Manage tokens’ link in the list

At this point, you should only have one token in your list. Click on the ‘Create Token’ button to add your second token (which you will later provide to CoSo Cloud):
Click Add token.
- User: this must be set to a System Administrator id/login.
- Service: Choose ADOBE CONNECT LTI from the dropdown menu.
- Leave the rest of the sections as they are (do not enable Valid until).
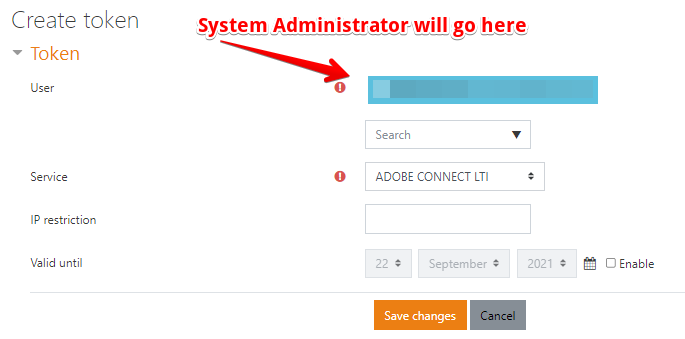
Click on the Save changes button to save.
*** Provide this second token to CoSo Cloud, as it is required internally at CoSo Cloud to finalize the installation.
Adding the LTI to a Moodle course.
Click on ‘Home’ and choose a course to click on. If you do not have any courses setup, please set one up to continue. From within the course, click ‘Turn editing on’ on the right.

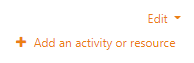
Then click on the ‘Add an activity or resource‘ link
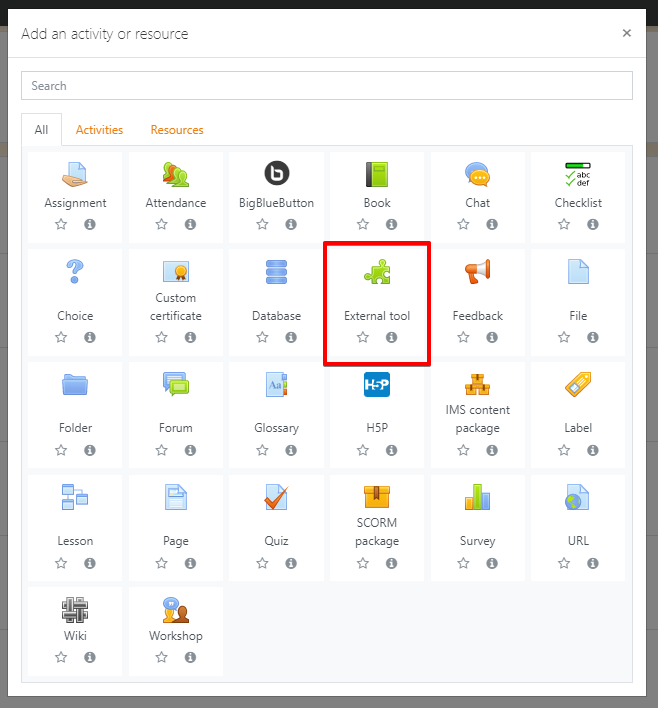
You will see the following menu, Select External tool.
Enter an activity name (we’ve used ‘ADOBE CONNECT INTEGRATION’ in our example)
For Preconfigured tool select ‘ADOBE CONNECT LTI’ from the dropdown menu

Click on ‘Save and return to course’ to save. The LTI integration should now appear in your course as such:
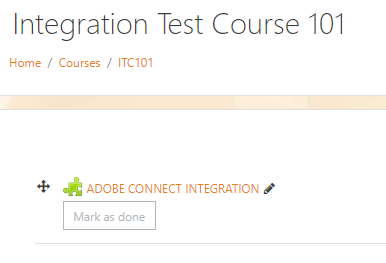
Click on the ‘ADOBE CONNECT INTEGRATION’ link and the integration should load as follows:
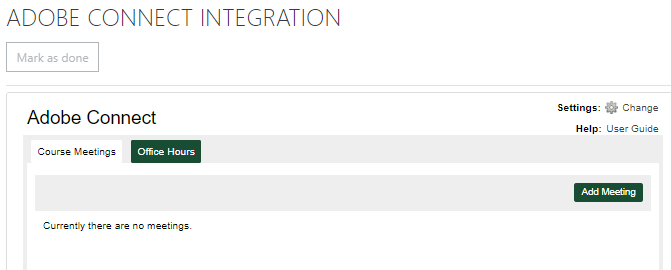
The LTI can now be accessed from within the course.